04. Installation of GFX60/GFX1440 Expert Advisors:
Lets now install the Expert Advisors that we have just downloaded in the last step. After having done the download of these Expert Advisors, and like what the user should have done already during the GFX-Connect software installation process, we should open the file with a compression software indicated during the last step, and put it in the correct folder as we'll see below:

As we can see, we should open the "experts" folder, which can be found inside the folder in which the Metatrader software is installed. On the example above, we have for that reason as the folder where we should put those files the folder "C:\Metatrader\experts".
We can see at the window at left on the example above that the file we've just downloaded, the "GFX_EXPERTS.zip", contained the files "GFX1440.ex4" and "GFX60.ex4" inside. The ".ex4" extension is the extension given to the Metatrader's executable files in that platform in version 4. Those files are for that reason files that don't allow their source code to be modified or read, because they are already compiled, but that is enough for us to put them inside the "experts" folder, in the folder in which the Metatrader platform may be installed, to be able to use them.
We can also see in the example above that the folder at right contains already several files and folders, but after we choose those two Expert Advisors with our mouse inside the compressed file, we should drag them to the "experts" folder as it was demonstrated on the example, and drop there those files.
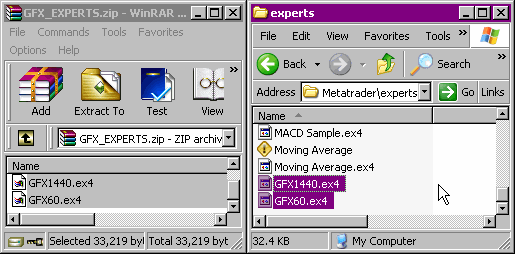
After having dragged those files to the "experts" folder, we'll see something like in the example above, which is basically the fact of being the two Expert Advisors inside the same folder that contains also other files that came originally with the Metatrader platform as the Expert Advisors that came by default like the "MACD Sample" and the "Moving Average", which as we can see both have also executable files ".ex4" ready to be used on the Metatrader platform by default.
This operation can be done with the Metatrader software still open, or closed. In case it is closed, we have this time to start the Metatrader software, and in case it would be already opened, we would have to close the Metatrader software and restart it again, and we would see that when start it we would have a huge difference, as we can see in the example below:
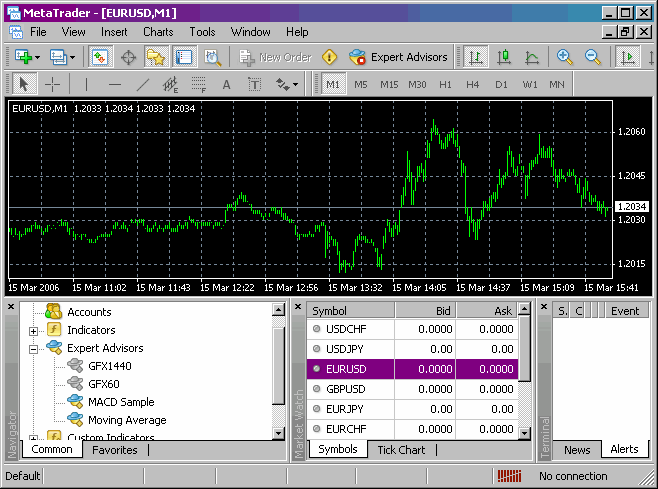
When restarting the Metatrader platform and reopening the "Expert Advisors" group in the "Navigator" window below, we will notice not only the two Expert Advisors that came by default with Metatrader, but this time four Expert Advisors, having now already there our GFX60 and GFX1440 also, but with the difference that they appear with a grey colour now, which is normal. The "MACD Sample" and the "Moving Average" appear colourful for having also their source codes available for modifying, and as that doesn't happen with the GFX60 and the GFX1440 Expert Advisors, our two would appear grey, but still functional nevertheless.
Lest see now how to add one of our Expert Advisors GFX60/1440 to our favourites:
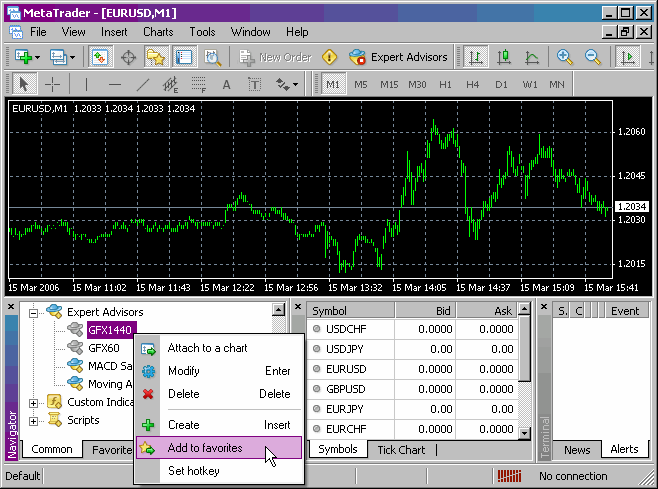
It is important to know how to add what we want to our favourites (the "Favorites" tab, in the "Navigator" window), because by having what we want there, we could this way have an easier and faster access to our favorite indicators and Expert Advisors that we may want to apply to a chart anytime without loosing ourselves throughout the Metatrader platform and in a quick way.
To do that we should click with the mouse's right button over the Expert Advisor that we want to see added to our "Favorites" section, as in the example above where we've chosen the GFX1440, the Expert Advisor created for being used with the Daily System, and a menu with some options will pop up, from where we will choose the "Add to favorites" option, and after that we'll click on the "Favorites" tab on our "Navigator" window and we'll right now check out the result of this action below:
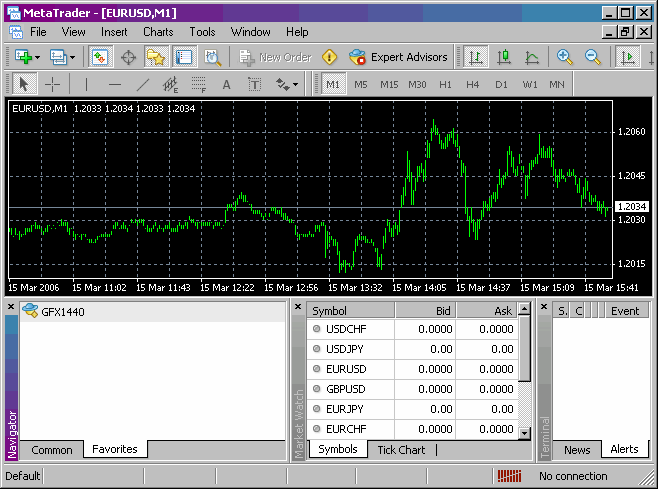
As we can see in the example above, we have already added there to our favorites the GFX1440 Expert Advisor. We must now repeat the same process being enough for us to click on the "Common" tab from the "Navigator" window and repeat the same option again, but this time with the GFX60 Expert Advisor.
And this way we've seen already installed our GFX60 and GFX1440 Expert Advisors, and already have them ready for being used in a practical and quick way, and now we only have to learn how to configure their parameters and know how to use them in the future.
05. Configuration of GFX60/GFX1440 Expert Advisors:
Lets start studying how we can add an Expert Advisor to a chart and put it this way working with a certain currency cross. As we can see in the example above, we should before anything else choose a chart in which we want to add the Expert Advisor itself, so that it may become active. As we only have one chart on the example above, it will always be that chart to be active so we don't have to choose any chart anytime because it is already chosen, as it is the only one existing in our platform on our examples.
Next, we'll click with the mouse's right button on the Expert Advisor that we want to use:
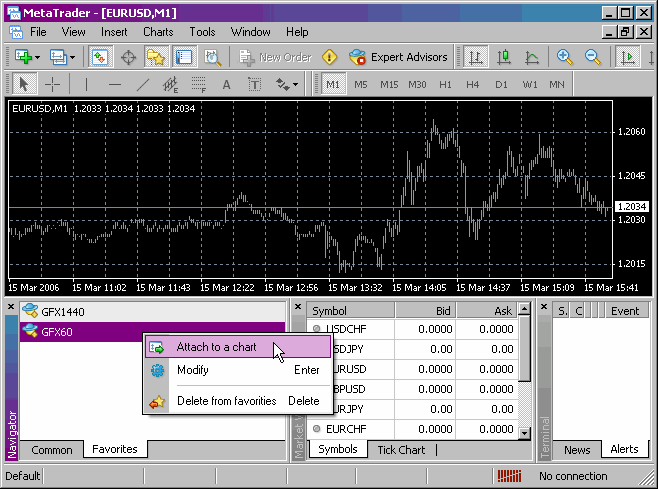
By clicking with the mouse's right button on the Expert Advisor, a menu with some options will pop up, where we should choose the "Attach to a chart" option, as we can see in the example above with the GFX60, and the GFX60 will become active in our chart, and a new small menu will then pop up with the options available for that Expert Advisor:
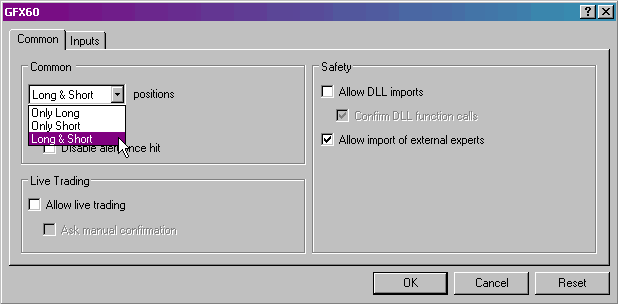
On that new menu, as we can see by the example above, we have two tabs, the "Common", with many global options, and the "Inputs", where we will have the variables from our Expert Advisor. We'll start by the "Common" tab.
As a first option, we have a ListBox that allows us to choose what type of positions can we let our Expert Advisor open. We can choose "Only Long", if we want it to open the Long positions only, those that make profit with price rises, "Only Short", if we want it to open the Short positions only, those that make profit with price falls, or "Long & Short", if we want our Expert Advisor to open all the positions that our systems may order it to open, whether they be "Long" or "Short", and that is the option that should be selected all the time.
If the system is to be used in a 100% automated way, that one is the option to be used. Of course the user may, in a given time when he may be certain that the prices could only rise or only fall, force the system to open only "Long" or "Short" positions, and that way trying to minimize losses or simply not to take supposedly risky positions, but that option, for those who want to use a trading system in a 100% automated way, should be avoided, as we would be inserting human emotions in the equation and that way we would end up loosing one of the advantages of mechanical trading systems, which is the one of eliminating human emotions from the equation and with that to avoid committing mistakes, besides that by filtering orders, we can end up filtering also the profitable orders and stay only with those that would possibly cause us losses, less profits than the systems would have. We would have much worse results with that option than if we would use the "Long & Short" one. To conclude, we should know that we should always use the "Long & Short" option.
After we add the GFX60 to the chart, we'll have the following:
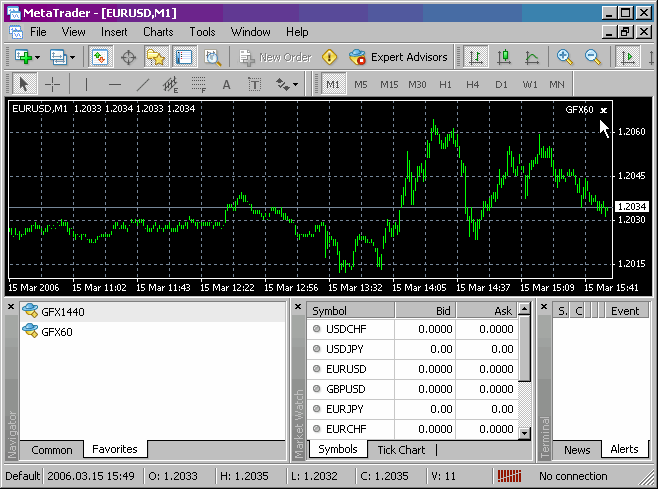
As we can see on the example above, we end up now having on our chart's superior right corner written "GFX60", which means that the GFX60 Expert Advisor is already associated to the chart, but followed with a "X" symbol. If it is this the case, it means that the Expert Advisor, may it be for being operating in offline mode and seeing "No connection" in the inferior right corner of the Metatrader platform, or for not having permission for using automated trading (some demo accounts don't allow it and other allow automated trading only for a small period like one month), may not work, being that way associated to the chart but without being able to execute the orders according to the signals provided by the trading systems.
Lets see what happens when our broker allows us to use the automated trading functionality, but that us, for the simple reason of not having chosen the "Allow live trading" option, wouldn't give that way permission for our Expert Advisor to execute orders in real time on the markets:
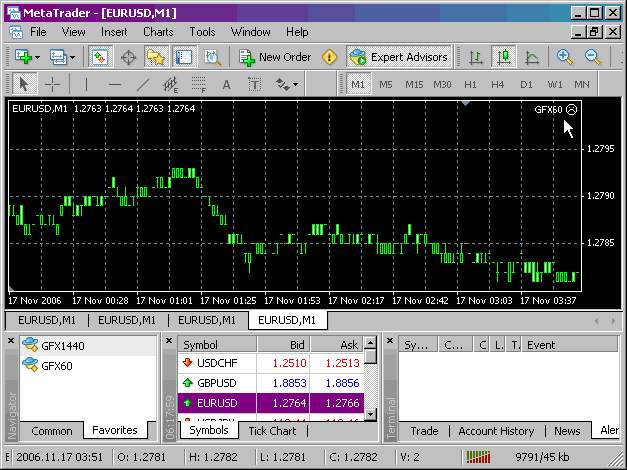
As we can notice by the example above, when we are allowed by the broker to use the automated trading functionality and are also connected, but having the "Allow live trading" unchecked as we've seen above, it continues to appear on the chart's superior right corner written "GFX60", but followed this time not by a "X" but by a ":-(" emoticon, and that discontentment smile tells us that the Expert Advisor won't do absolutely nothing with our capital as it can't invest in real time in an automated way, and in that case we would have to be ourselves executing our orders by hand.
Lets see now how to correct the problem:
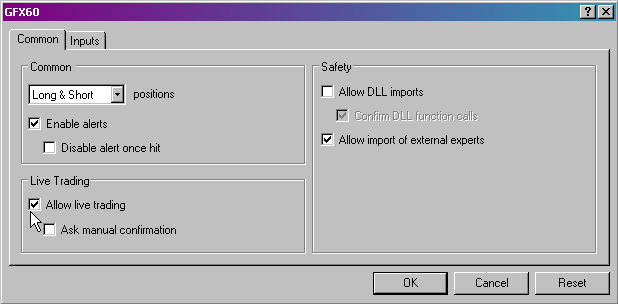
It's enough for us to click with the mouse, as we can see in the example above, on the empty CheckBox that says "Allow live trading", and after it is checked, we just have to click on the "OK" button, to have now the ":-)" emoticon and start seeing the system executing orders in real time.
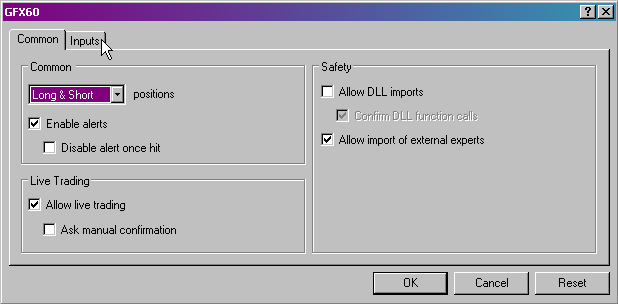
Now that we can see the "Allow live trading" option activated, but before we get back to the chart and to the real time orders, lets first study all the variables that allow us to activate and modify those functionalities from these two Expert Advisors. We have there, as we can see by the mouse cursor in the example, a tab named "Inputs", which we'll click next:
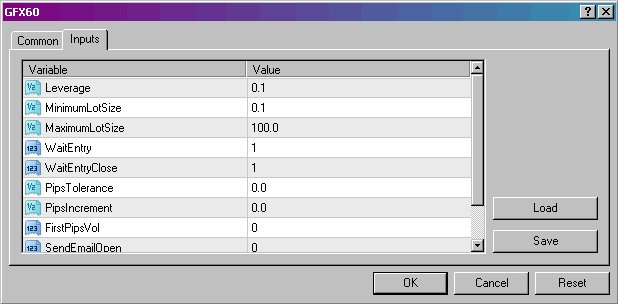
By clicking in the "Inputs" option, we'll have our window presented as we can check in the example above. As we can see, we have a two column table, the left one containing the variables' names, and at their right side having their values, corresponding to each one of them and that we can change anytime, containing there in this case the default values, as those are the values which the GFX60 and GFX1440 Expert Advisors bring with them since the first time they are connected, as they were never changed before at that time. Basically, those are their configurations.
We will see below what each exposed variable above represent, and how their values can modify our Expert Advisors' behaviour. For now we'll only learn how to change their configuration values and how to use this window, and how to save them for future use in other Expert Advisors, amongst other things:
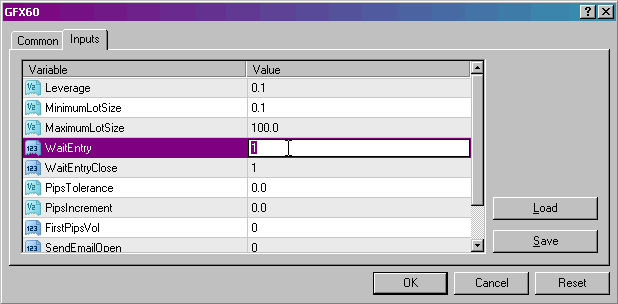
By double-clicking with the mouse right button on the each variable's value, we obtain the result that we can see in the image above, which means that we stay with the variable designation in a dark blue colour, and with the value it represents, in this case "1", chosen and with a blue colour also, in a way that allows us now to start writing directly over it. Some variables refer to certain functionalities, where we could use only two chars to choose what we want them to do: "1" for turning its functionality on, and "0" for turning its functionality off.
We have then, on the example above, after double-clicking the "WaitEntry" variable, the algorism "1" chosen, and we will simply click on the 0 key, and then click on the enter/return key, becoming the window something like this:
Now, as we can see by the window above, it continues selected the "WaitEntry" variable, to help us signalize which was the last modified variable, containing it this time the algorism "0". Lets go then, just for exercising purposes, put the "WaitEntryClose" also at "0", and also the "SendEmailOpen" as well as the "SendEmailClose" variables to "1":
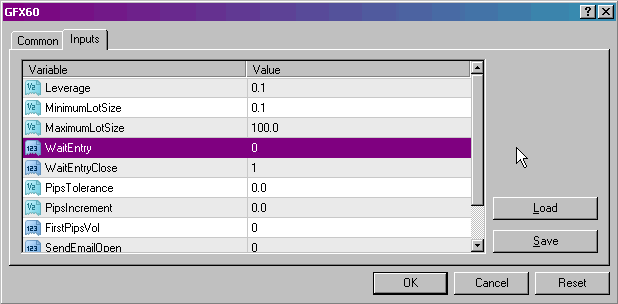
We have just stayed with the visual aspect seen above, variables already with the values that we wanted them to have, and we will put also, as we can see above, the mouse cursor above the "Save" button, and click on that button:
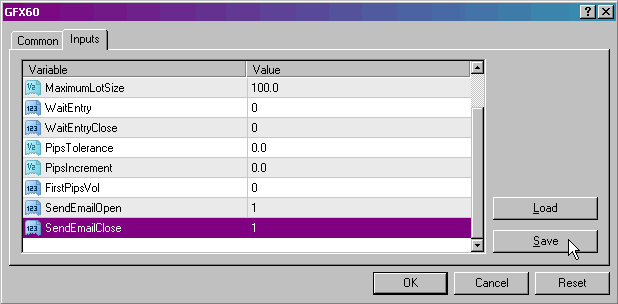
By clicking on the "Save" button, we end up having, as we can see, the "Save As" window open, where we should choose a name to give to our configuration file in the "File name:" field:
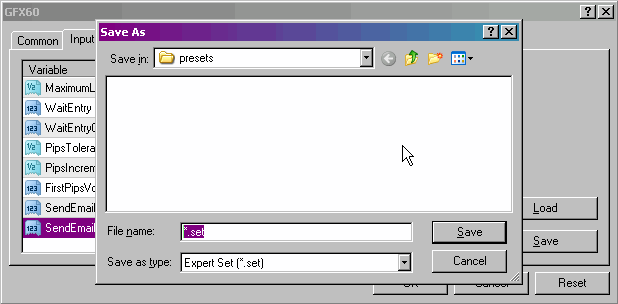
On the example above, as we can see, we have the "File name" field chosen, where we'll give a name to the configuration file:
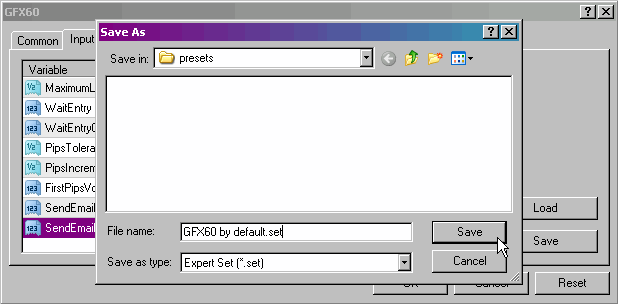
At this moment, we've just given as a name to our configuration file "GFX60 by default", which will end up having the ".set" extension at the end, and we'll now click on the "Return/Enter" key or on the "Save" button:
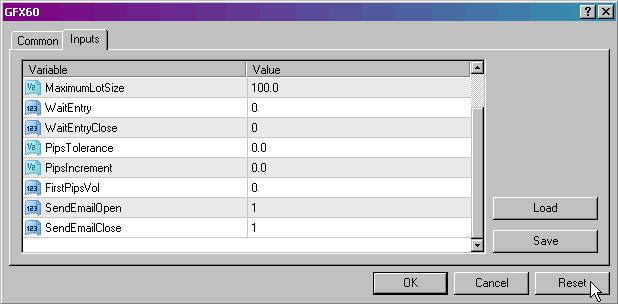
We have returned this way to the configuration file, with all the variables as we had a few time ago, before saving the configuration. Lets now click with the mouse left button, as we can see in the example above, on the "Reset" button and see what happens:
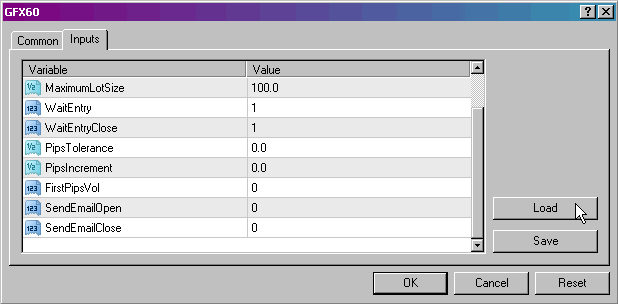
As we can see by the image above, we've returned by clicking on the "Reset" button, to the initial values that the Expert Advisor has by default, because that is that button's function, making our previous modifications null.
Lets click with our mouse button now, as we can see on the image above, on the "Load" button, and we'll obtain the following result:
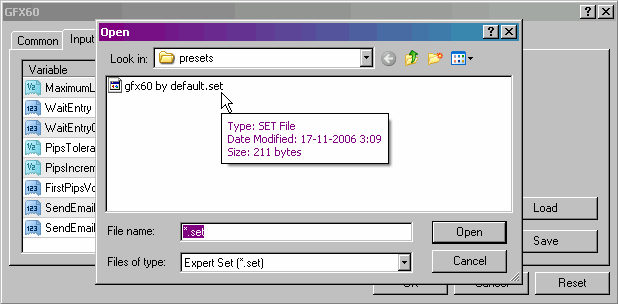
By clicking on the "Load" button, we get the "Open" window, where in the white box in the middle, which is used to show us the configuration files already saved, we can find already our configuration file, saved a few time ago, appearing this time with the name "gfx60 by default.set", in lowercase, being as shown in the example by passing our mouse over that box, a "SET" file, for having the ".set" extension, which is the type of file where Metatrader saves the configurations from our Expert Advisors.
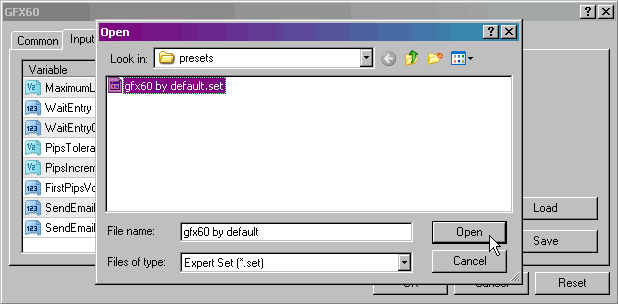
Next, as seen in the example above, we must choose the file that we've just saved, so that it stays chosen, appearing this way with white characters in a dark blue background, and then we would click on the "Open" button. We could also click directly two times on the file in question, obtaining the same effect.
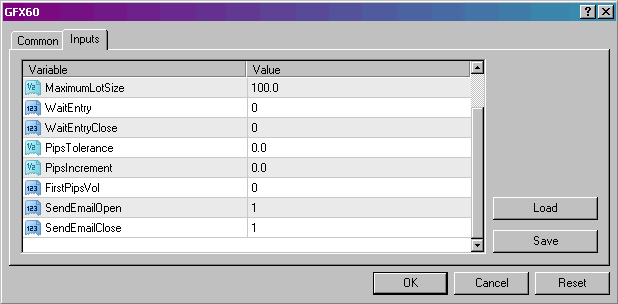
We go back this way, as we can see in the window above and through the values that its variables contain, to the configuration that we've made a few moments ago and saved on the configuration file that we've just got. We will now on the next section learn how to configure those same variables.
